
Water System:
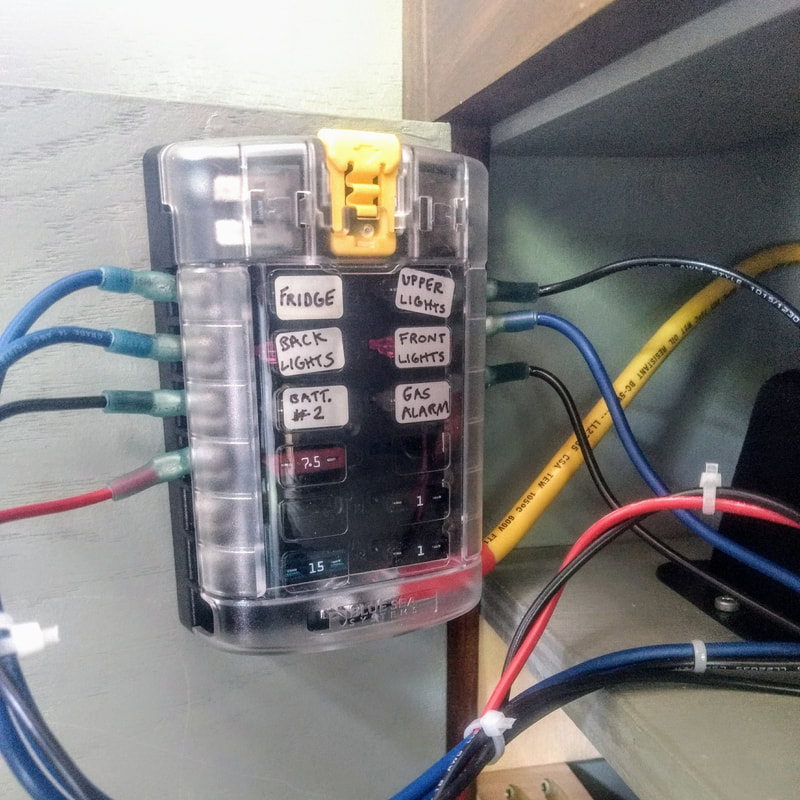
Electrical (Solar) Power:
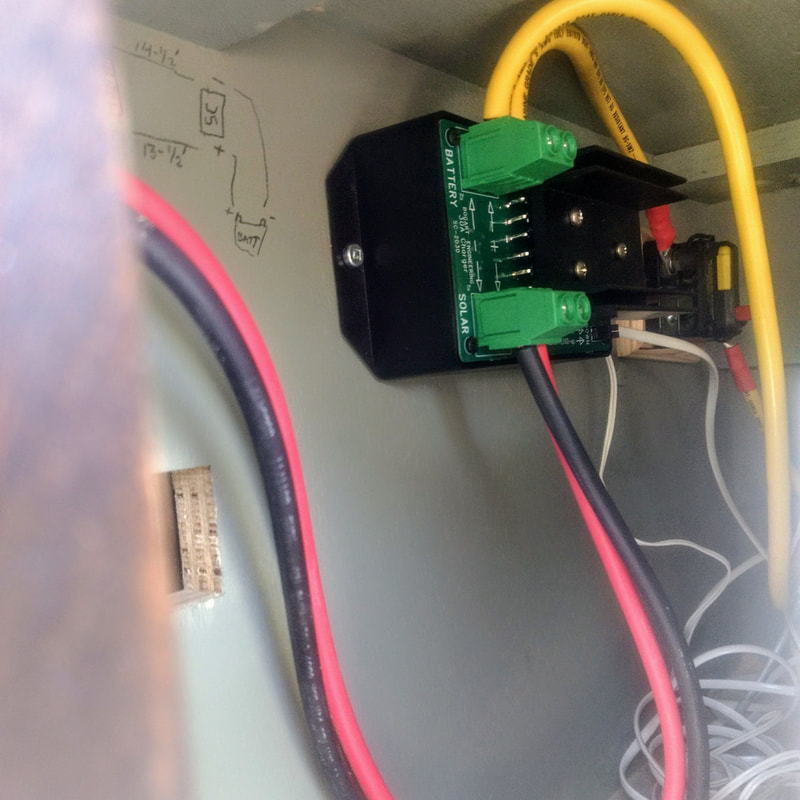
We started off planning to upgrade to solar down the road, but as I started estimating electrical loads and calculating component capacities, I quickly realized that for a small van like this, I had to go with a solar setup. So here's how we approached our build:
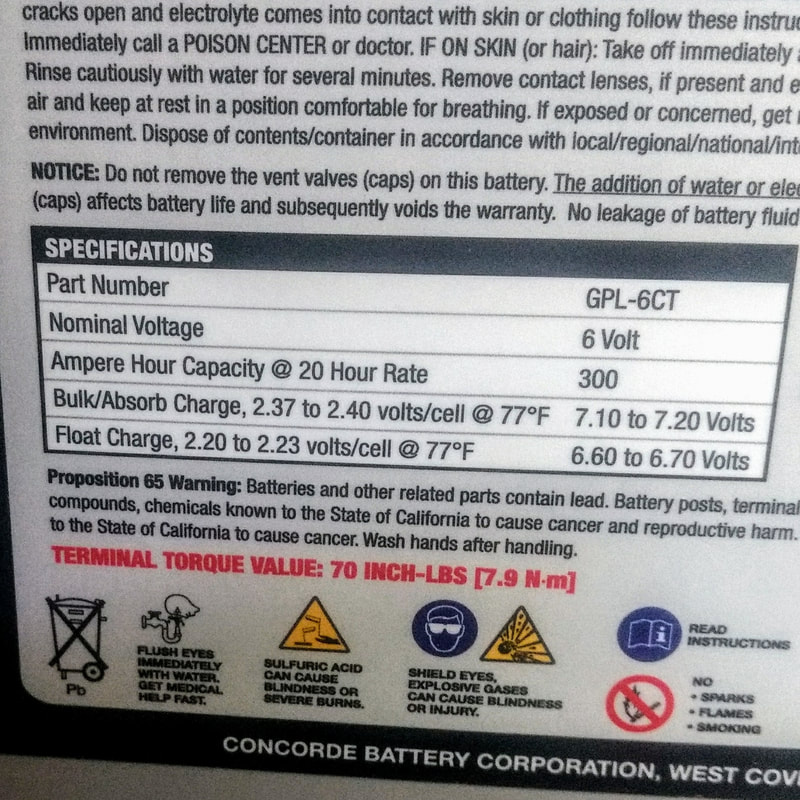
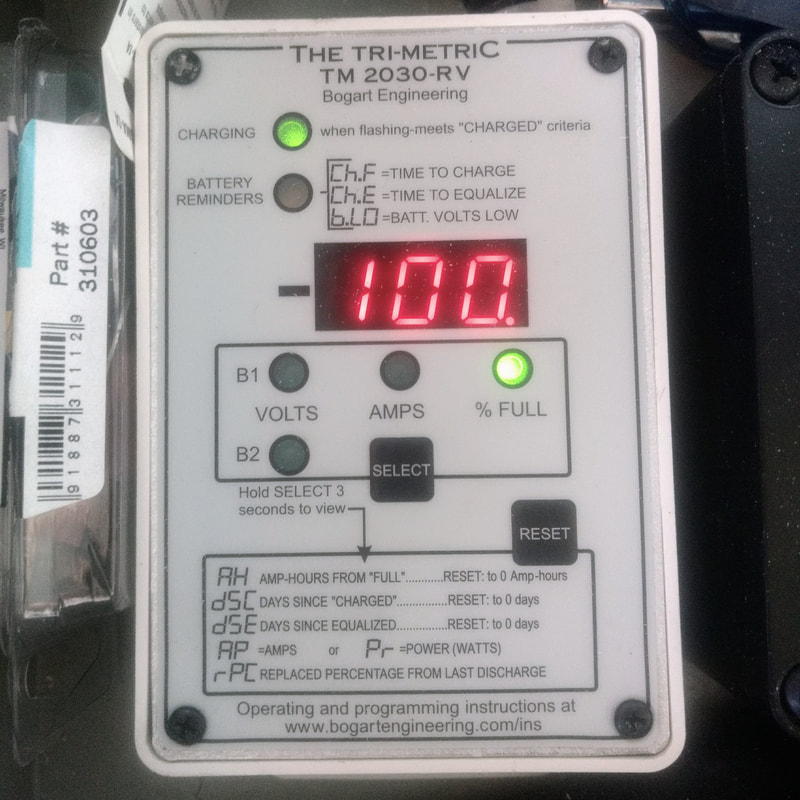
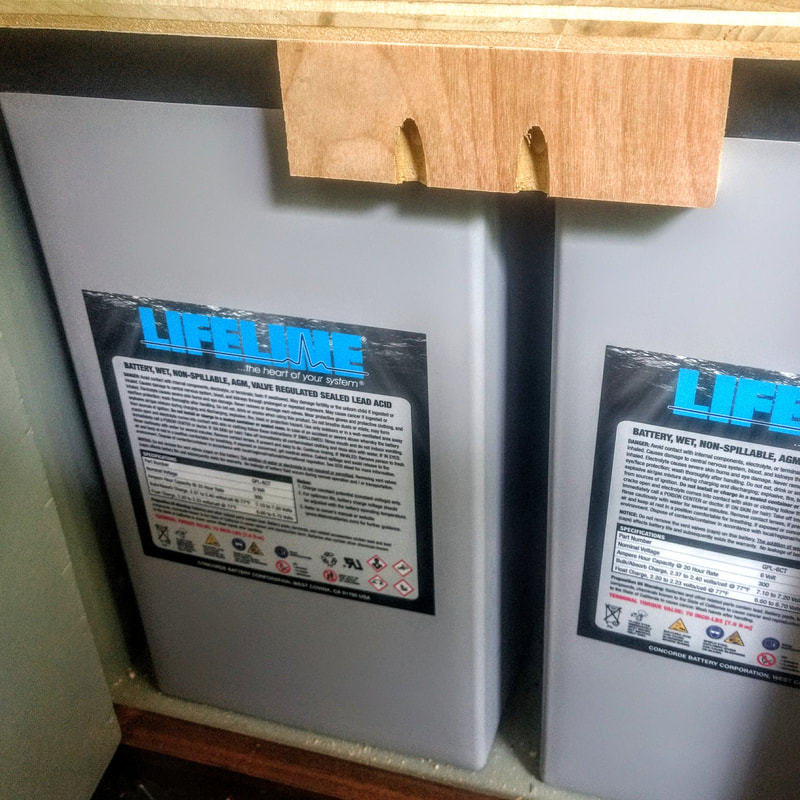
First off, we started with our loads. We wanted (LED) lights at night, the occasional A/C electric load, and a 65-quart refrigerator/freezer, and some other smaller loads. Our estimated daily consumption was somewhere around 70 Ah (in 24 hours); then we split that into daytime/night time loads (40Ah / 30Ah respectively). Our expectations for the system were for the batteries to be at 100% everyday by the time the sun begins setting in the afternoon (assuming it's a mostly sunny day). Therefore, if we were 100%-full at sundown, then at sunrise we would be approximately 30Ah down from a 100% charge. We wanted this "30Ah" deficit to represent 10-20% of our battery system's capacity. Based on the available batteries that we were looking at, the LifeLine GP6-CT worked best for us, so we went with a 300Ah battery bank.
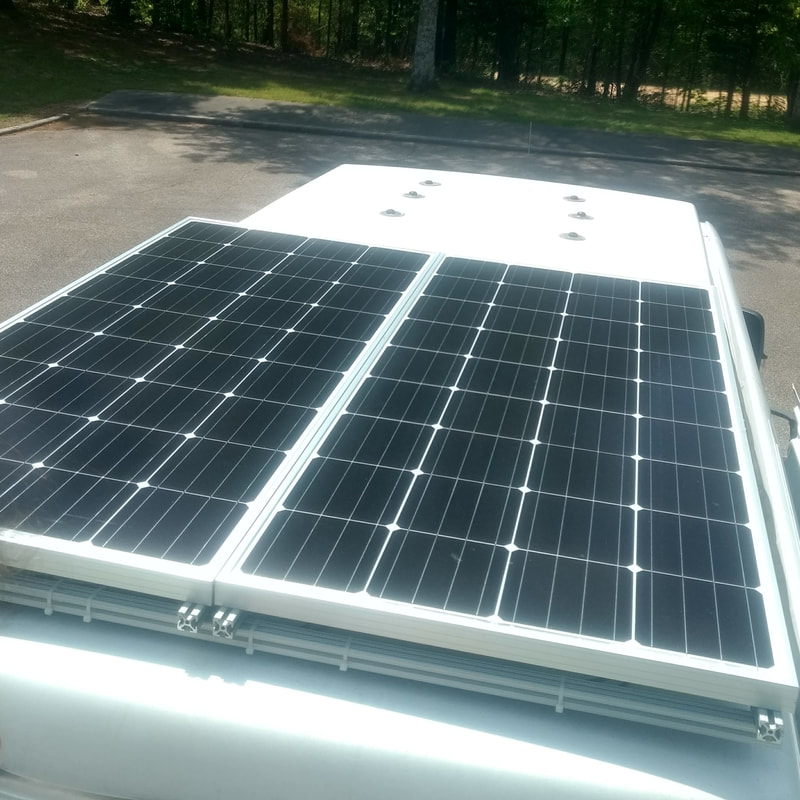
Now, since we were waking up in the morning with a 30Ah deficit that we needed to recharge during the day, plus the normal 40Ah loads that would be consumed during the day, we needed to be able to put 70Ah back into our batteries every day. I assumed that we wanted to be able to do this with 5 hours of peak/good sunlight per day. 70Ah/5hours = ~14Amps. So I needed to be able to supply at least 14 Amps to the batteries from our solar panels. Since we were mounting the panels flat on the roof, rather than angling them to optimize sunlight, we have to account for a ~40 loss of efficiency (ouch!). So 14Amps/60%=23Amps. Each 100W solar panel can produce about 6Amps of electricity. So to get 23 Amps, we would need about 400Watts of power. We went with (2x) 180W panels from Grape Solar.
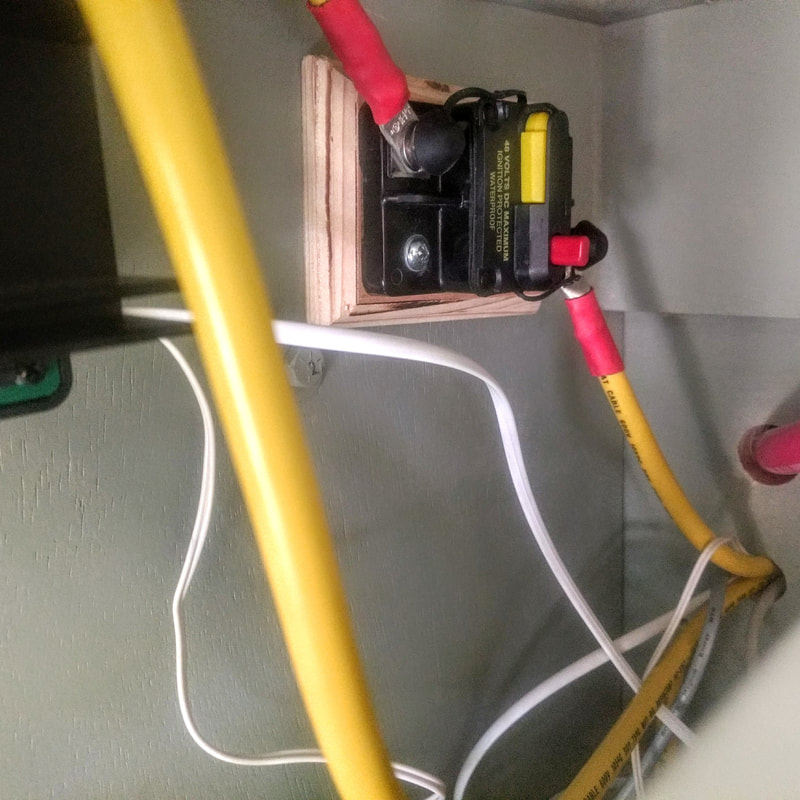
To supplement our solar system, we have the ability to combine our house batteries with the engine battery while we are driving to take advantage of the alternator, and we have a small, 1600W Honda generator.
Now for the pictures:
First off, we started with our loads. We wanted (LED) lights at night, the occasional A/C electric load, and a 65-quart refrigerator/freezer, and some other smaller loads. Our estimated daily consumption was somewhere around 70 Ah (in 24 hours); then we split that into daytime/night time loads (40Ah / 30Ah respectively). Our expectations for the system were for the batteries to be at 100% everyday by the time the sun begins setting in the afternoon (assuming it's a mostly sunny day). Therefore, if we were 100%-full at sundown, then at sunrise we would be approximately 30Ah down from a 100% charge. We wanted this "30Ah" deficit to represent 10-20% of our battery system's capacity. Based on the available batteries that we were looking at, the LifeLine GP6-CT worked best for us, so we went with a 300Ah battery bank.
Now, since we were waking up in the morning with a 30Ah deficit that we needed to recharge during the day, plus the normal 40Ah loads that would be consumed during the day, we needed to be able to put 70Ah back into our batteries every day. I assumed that we wanted to be able to do this with 5 hours of peak/good sunlight per day. 70Ah/5hours = ~14Amps. So I needed to be able to supply at least 14 Amps to the batteries from our solar panels. Since we were mounting the panels flat on the roof, rather than angling them to optimize sunlight, we have to account for a ~40 loss of efficiency (ouch!). So 14Amps/60%=23Amps. Each 100W solar panel can produce about 6Amps of electricity. So to get 23 Amps, we would need about 400Watts of power. We went with (2x) 180W panels from Grape Solar.
To supplement our solar system, we have the ability to combine our house batteries with the engine battery while we are driving to take advantage of the alternator, and we have a small, 1600W Honda generator.
Now for the pictures:

|

|
Cooking System:
The Bathroom:
Cabinetry:
This was the hardest decision yet when it has come to our build. Some people say 1/2" plywood, vs 3/4" plywood vs 80/20 aluminum framing, etc. There are a lot of options. I had such design paralysis that I made no progress. Then I had a conversation with another Sprinter owner and he told me how he would build everything with low-grade plywood to test his layout. Then if he liked it after a year or two, he would rip it out and build a "final draft" so to speak. I loved this approach. It gave me the freedom to not make a perfect, fully-optimized decision.
So I settled on 3/4" plywood from Home Depot.
From previous travels in Ronde, we knew that we wanted a way to increase our stealth factor when the need should arise. There have been a couple of times road tripping, where we pulled into a parking lot with the plan to crash for the night. Parking fro one night is usually no big deal, but when the pop-top is up, it definitely catches the attention of passer-bys (including local law enforcement). I've only been run off once in the middle of the night, but it was enough to make me wish I had a more discrete sleeping arrangement at times.
All that is to say, we designed a cabinet layout that we could drop our bed down on to. The rear cabinets are designed to be our trunk. We cannot really access them from inside the van, however, we haven't yet needed to either. Our inverter, generator, and other miscellaneous items live full time back there.
The side cabinets store our water tanks.
Sleeping System:
Our penthouse top was installed by Sportsmobile Texas in Austin, TX. This is the only modification I did not want to take on myself. It was a very pricey modification but we knew that we were going to spend this before we even bought the van. We got the manually operated top because a little exercise never hurt anybody. If I get too old, or the roof gets too heavy, I'm sure I can figure out a retrofit to have the lift mechanized.
We built the bed ourselves. The build was pretty straight forward. 3/4" plywood with two 3" wide, 3/4" strips at each end for reinforcement. We ordered the foam online. We bought the fabric from Jo-Annes fabrics, and we glued and stapled everything together. If we had to make the bed again, I would probably not make the mattress as thick. We went with a 6" thk mattress. It's comfortable, but it makes the bed a little heavier than ideal.
We sleep in the Penthouse most of the time when we travel. However, on occasion we have to go stealth mode. In these circumstances, we will pull the bed down from it's rails and set it on the countertop. This utility was designed from the outset and we love being able to do it.
